Welcome back to How To Admin Your Site. Last week we covered modifying your template and reminded everyone how to do a Roster Import. We have more in store this week so feel free to click the links below to jump ahead:
Recruiting Settings | Guild Application | Recruiting by Class | Widgets | Pictures | Homepage Music
Recruiting Settings
Among the various uses for your Guild Site, Guild Launch provides you with plenty of tools to help you recruit new players to your guild. We even give guilds the ability to post their recruiting information on our Launch Pad community site!
To get started, lets go to your Admin section and click the Members tab. On the left is a section for Recruiting and that is where we are going to spend our time. Click the Main Settings link and we will start there.
Our first option "Is Your Guild Recruiting?" is fairly straightforward. Turning this off will remove the Apply to Guild link on your site as well as the rest of that recruiting area.
The second option "Display the Apply to Guild Link in the default location?" is a touch more involved. Essentially what this will allow you to do is hide the default Recruiting option on the left side of your page and allow you to add a recruiting widget to your site.
What would you want to do that? Widgets can be moved or modified for starters. If you wanted to have the recruiting options on the right hand side of your site, you would need to use this option. To take advantage of this, first turn the Default Recruiting Display off, then go to your Content tab and click the Sidebar Widgets link. On that page, you can add the Recruiting Widget and move it around like all other widgets. See the Widgets section for more information on widgets.
Next is to display your recruiting status on Launch Pad. Do you want to be listed on a page where every Guild Launch member can see your guild is recruiting? If yes, select the Yes option, write a summary about your guild and what you are looking for and you are all set!
After that, you can configure new applications to be posted in a forum. This is a great way to have your current guild members or Officers discuss an application to be considered before approving or denying it.
You will first need an Application forum if you do not already have one. You can add a forum by going to the Admin section and clicking the Forums tab. Once the forum is created, it will show up in the drop down box and selecting it will post all applications to that forum:

Auto Responses are a great way to save time with your Applications. If you have an auto response set up, it will send a PM to that user containing that information if you approve or decline their application. An acceptance response may direct a user on claiming their character and making a post in the forums for example.
Our last Recruiting Setting is the Launch Code. This is a way to get members from in game to your site without having to submit an application. With the Launch Code, the user could come to your site and instantly have member access without submitting an application.
They only need to use the Launch Code once and they still need to click the Apply to Guild link. The step before the Guild Application will ask if they have a Launch Code and if the proper code is entered, they are all done.
Guild Application
The next item on our list is the Guild Application. We have two different types of Application and you can use either one. The Basic Mode application is simply a text box. You enter your application as you would type it in an email or word processor and your applicant submits that information with their response to your questions. The nice thing about Basic Mode is that the application process is quickly created and easily modified.
In advanced mode, you set up your questions and instructions using various web style fields. This makes the application have forms that are filled out like our account creation process. The Advanced Application also allows you require certain questions be answered before it can be submitted.
The only option aside from Basic and Advanced Mode is Availability Info. Turning this on gives applicants the ability to list their availability in the application and the form looks like this:

Recruiting By Class
I often receive emails on how to configure this or suggesting that we add this feature. Clicking the Recruiting by Class link on the left of the Members tab in your Admin section will give you these options.
This is fairly straight forward. You enter what class you are looking for, the number or "size word" (like low, medium or high) and determine how it is ordered. Click Add and you are done!
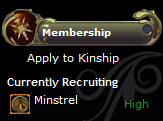
For several games we have Class Icons. So if you play Lord of the Rings Online and type in Minstrel for the class, you will also have the Minstrel icon:

Since we use Partial Matching, I could also list a spec or role. Healing Minstrel would also display the class icon. Balance Druid and DPS Druid would still display the World of Warcraft Druid bear claw icon.
Widgets
Widgets are what give your site content. My first Pro Tip was about the HTML Widget and its limitless uses. We have tons of other widgets and each one will allow you to make your site unique.
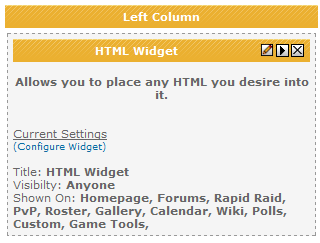
To add a Widget, go to the Admin section and click the Content tab followed by the Sidebar Widgets link on the left. To add a widget simply select the widget you want and select its location then click the Add Widget button. You will see the widget listed in the column you placed it, something like below:

As you can see, I added the HTML Widget to my Left Column. Lets talk about the options for widgets.
At the top of the widget is the name, a pencil icon, an arrow pointing right and an X. The pencil icon will allow you to change the name of the widget, who can see it and on which pages it is shown. If you do not want your Guild Description to be shown to current guild members, click the pencil and select Non Site Members Only.
The arrow allows you to change its position. Did you mean to add the widget to the center column or do you want it above or below another widget? Just click the proper direction (up, down, left or right) to move the widget.
The X will remove the widget and all content associated with it. If you added an HTML Widget and included something in that widget, clicking the X will delete that information.
Some widgets have further customization options. The HTML Widget would be useless if we did not put something in it. Same for Raid Progression. For these widgets, go to your site and click the appropriate link. Once there, you can further edit your widget and you are all set.
Pictures
Screen it or it didn't happen! A common phrase in the gaming community. What better place to show off your boss kill or in game accomplishment than your guild site? Maybe you want to show your child's first steps or a picture of your gaming rig.
To show a picture on your site, it first needs to be uploaded to the Internet. I suggest using your guild's File Library if the Admin allows it. If not, there are plenty of places on the Internet to store your pictures.
Once the picture is on the Internet, you need the URL for that image. Go to the picture in question and right click on it. In the menu select Copy Image URL or something similar. The actual text will depend on your browser.
With URL in hand, go to your guild site's forums and make a new post. You will notice there is an icon of a tree and that will allow you to insert an image:

Clicking that icon will put the beginning image tag in your post [img] and you want to paste your URL after that, then click the image icon again. The end result would look something like this:
[img]http://www.google.com/intl/en_ALL/images/logo.gif[/img]
Using the Guild News widget and setting the post as an announcement will allow that image to be displayed on the homepage of your site!
Homepage Music
The last thing I will cover today is adding music to your Homepage. Currently there are two methods to add music to your site, but I will describe only one of them. The reason is the other method is unreliable at best and far more confusing.
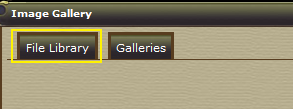
The first thing you need is a song on your computer. The song will need to be MP3 formatted to work properly. With your song ready, go to your Gallery and click the File Library tab:

Here, click the Browse button and find the song you want on your site. Once you have found it, upload it and you will see it listed.
Pro Tip - If the file listed does not end with .mp3 it is the wrong type and will not work.
Once your mp3 is uploaded, go to your Admin section and click the Content tab. On the left is a link for Homepage Music. On the Homepage Music page, you should see a drop down box with the file you just uploaded (and any other mp3 files listed in your File Library). Select the song and click set and you are all finished.
That is all this week and wraps up How To Admin Your Site. Get out there, customize your site and make sure to send us your hard work to be featured as a Spotlight Guild! Send your site to newsletter@guildlaunch.com to be considered.
Next week we will take a look at Guild Launch through a Members eyes instead of an Admin. Stay tuned!
~Mike
No comments:
Post a Comment